Valentine's Day Cards
My school is having a Valentine's Day card exchange this year - something that I've never gotten the chance to participate in before. We had the option to print them out online, buy them at a store, or hand-make them. Me being me, I decided to make them, because I love crafts. Being the fact that there are about 12 people in all that signed up, I decided to make 12 different cards - no two can match! However, once I got started, I decided that I wanted to make cards for other teachers I have or have had in the past. I believe that now I'm up to 15 cards.
A LOT of cards, right?
Today, I thought that I would share a few tutorials on how to make Valentine's Day cards. The first card I'll show how to make is this one:
I blurred the name out simply for privacy reasons :-)
Materials needed: Dark red paper, light red paper, Sharpie, scissors that cut in a curve, glue
Instructions: To create this card, begin by folding a dark red piece of cardstock in half. Cut out a rectangle of light red paper that is about half the size of the dark red piece. Trim one of the sides with the scissors that cut in a curve. Glue it to the dark red paper. Next, cut two small squares of light red paper, and trim around them with the special scissors. Glue on so that it is in-between the dark red paper and the light red paper. Cut a small rectangle of light-red paper, and trim around it with the scissors. Glue that to the bottom right-hand corner of the card, and glue the second red square over it. Write the person's name on the middle square, and then a small message such as "Happy Valentine's Day!" on the second square. You're done!
Here's how to make this card:
A LOT of cards, right?
Today, I thought that I would share a few tutorials on how to make Valentine's Day cards. The first card I'll show how to make is this one:
Materials needed: Dark red paper, light red paper, Sharpie, scissors that cut in a curve, glue
Instructions: To create this card, begin by folding a dark red piece of cardstock in half. Cut out a rectangle of light red paper that is about half the size of the dark red piece. Trim one of the sides with the scissors that cut in a curve. Glue it to the dark red paper. Next, cut two small squares of light red paper, and trim around them with the special scissors. Glue on so that it is in-between the dark red paper and the light red paper. Cut a small rectangle of light-red paper, and trim around it with the scissors. Glue that to the bottom right-hand corner of the card, and glue the second red square over it. Write the person's name on the middle square, and then a small message such as "Happy Valentine's Day!" on the second square. You're done!
Here's how to make this card:
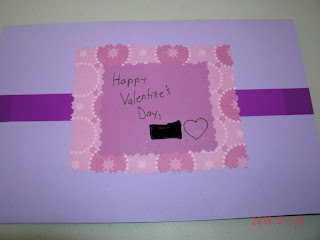
Red and pink aren't the only Valentine's Day colors! An array of different tones of purple work for a Valentine's Day card as well.
Materials: Light purple paper, purple tape, medium purple paper, patterned purple paper, craft scissors from the above card, glue, and a Sharpie.
Instructions: Fold the light purple paper in half, or, if you already have a light purple card blank, you can use that. Next, wrap the purple tape around the front of the card - you can choose to either wrap the ends around the inside of the card, or cut them off. After that, use the craft scissors to cut a large square from the patterned purple paper. Glue that on top of the purple tape. Finally, cut a smaller square from the medium purple paper (still using the craft scissors). Write a small message on the front, including the recipient's name. The card is done!
It can be really hard to make Valentine's Day cards for guys - with a Valentine's Day card exchange, you must make a card for everyone who signed up, which does include guys. There are lots of ways to make a nice card for a male student, though! An idea is below.
Materials needed: Light purple/pink cardstock, light green cardstock, dark green cardstock, purple tape, glue, and a Sharpie.
Instructions: Begin by folding the light pink/purple cardstock in half. Then, cut out a rectangle of light green paper that is slightly smaller than the pink paper. Glue it onto the card. Using the dark green paper, cut out three small hearts. To make even hearts, cut out a small rectangle, fold it in half, and cut out a shape that looks like half a heart. When you unfold it, you should have an equal and even heart. Do this three times, and then glue the hearts onto the middle of the light green cardstock. Finally, cut off a small section of the purple tape to go over the middle of the card. Try to cover the middle of the 2nd heart, or place it wherever you would prefer it to go. Finally, write "Happy Valentine's Day!" on the purple tape, and the name of the recipient on one of the hearts (I chose the top heart, as that was where I thought it would look best). Enjoy!
Thanks for reading, and happy early Valentine's Day!
-Lizzie


Comments
Post a Comment